Search for answers or browse our knowledge base.
-
Behaviour Scoring
-
- 1. Anxious in unfamiliar situations
- 2. Fear Of Noises
- 3. Fear of Novel Objects
- 4. Fear of Underfootings
- 5. Fear of Dogs
- 6. Fear of Stairs
- 7. Fear of Traffic
- 8. Separation Anxiety
- 9. Hyper-Attachment
- 10. Fear Of Strangers
- 11. Body Handling Concern
- 12. Retreats When Reached For
- 13. Harness Handle On Back Sensitivity
- 14. Avoidance Of Blowing Fan
- 15. Body Sensitivity To Object Contact
- 16. Anxious About Riding In Vehicles
- 17. Inhibited or passively avoidant when exposed to potentially stressful situations
- 18. Activated when exposed to potentially stressful situations
- 19. Excitable
- 20. Slow To Return To Productive Emotional State
- 21. Fidgety When Handler Is Idle
- 22. Fear On Elevated Areas, Drop-Offs Etc.
- 23. Barks Persistently
- 24. High Energy Level
- 25. Lacks Focus
- 26. Movement Excites
- 27. Chasing Animals
- 28. Dog Distraction
- 29. Sniffing
- 30. Scavenges
- 31. Inappropriate Behavior Around The Home
- 32. Lacks Initiative
- 33. Not Willing
- 34. Resource Guarding Toward People
- 35. Aggression Toward Strangers
- 36. Aggression Toward Dogs
- 37. Resource Guarding Toward Dogs Or Other Pets
- 38. Inappropriate Elimination While Working En Route
- 39. Socially Inappropriate Behavior With People
- 40. Inconsistent
- 41. Handler/Dog Team
- 42. Relationship Skills
- 43. Comparison 9 To 1 Score
- 44. Socially Inappropriate Behavior With Dogs
- 45. Thunder Reaction Prior To, During Or Immediately After A Thunderstorm
- 46. Kennels Poorly
- 47. Working Speed
- 48. Gait When Moving Out
- 49. Housebreaking Problems
- 50. Innate Desire To Work
- 51. Avoidance Of Exhaust From Vehicles
- Show all articles ( 36 ) Collapse Articles
-
-
-
Practice Videos
-
Behavior Testing
-
Database User Manual
-
-
-
- Adding a New Dog (using Manage Your Dog’s Data, MyDogs)
- Alerts
- BCL, Behavior Checklist
- Elbow Quick, Add new
- Estrus & Whelps
- Eye Quick
- Genetic Test Panel
- Genetic Test Quick
- Health Diagnoses Add/Edit
- Health History Report
- Health Normals, Add new
- Heart Quick
- Hip BVA, Add new
- Hip FCI, Add new
- Hip OFA, Add new
- Hip Penn Hip, Add new
- Photos PDFs etc.
- Private Notes
- Procedures, Add new
- Reminders
- Share my dog data to another organization
- Skin Quick
- Status History
- Weight - Entering a dog's weight
- ADI Public Access Test
- Hip Vezzoni, Add new
- Status Detail
- Edit or Change Call Name / Pedigree Name / Owner ID
- Add New Microchip / Delete Incorrect Microchip
- End Reasons
- Juvenile Estrus
- Communications Activities
- Incidents
- Creating Dog Records - What to Enter
- Creating Dog Records - Budgeting Time for Data Entry
- My Dogs Overview
- My Dogs Tabs Overview
- Show all articles ( 22 ) Collapse Articles
-
- Articles coming soon
-
-
-
-
- Alternate Therapy/Rehab
- Diagnostic Imaging, Add new / Edit or Delete
- Diet
- Elbow Quick, Add new / Edit or Delete
- Estrus & Whelps, Add new
- Eye Quick, Add new / Edit or Delete
- Genetic Test Quick, Add new / Edit or Delete
- Health Diagnoses, Add new / Edit (Update) or Delete
- Health History Report, Generate a PDF
- Health Normals
- Health Screening List
- Hip OFA Add new / Edit or Delete
- Hip Penn Hip Add new / Edit or Delete
- Hospitalization, Add new
- Kennel Tasks, Add new / Edit or Delete
- Lab, Add new / Edit or Delete
- Photos, PDFs, etc., Add new
- Reminders Add new / Edit or Delete
- Rx, Add new / Edit or Delete
- Semen Cryo, Add new / Edit or Delete
- Skin Quick Add new / Edit or Delete
- SOAP, Add new / Edit or Delete
- Status History
- Supplies Used, Add new / Edit or Delete
- Surgery, Add new
- Treatments Add new / Edit or Delete
- Vaccines Add new / Edit or Delete
- Weight and BCS Body Condition Score - Add new / Edit or Delete
- Hip Vezzoni, Add new
- Show all articles ( 14 ) Collapse Articles
-
-
-
- Client Services - Client Basic Info/ Add & Edit
- Edit Application
- Manage Team Training
- Active Graduated Team
- Chart Active Dogs By Age
- Facility Basic Info
- Active Facility Dogs
- Client Program Types and Training locations
- Order of Entry for Client Records
- Creating Client Records
- Facility Dog Applications
- Placing Dogs with Clients and Graduating Teams
-
- About People/Organizations
- Relationships
- Breeders List
- My People
- Public People & Orgs
- Updating a Dog's Foster Carer / Puppy Raiser / Breeding Host
- Managing Puppy Raiser and Breeder Host applications
- Entering Private People & Organizations
- Entering Public People and Organizations
- Foster Carer Application and Management
- Releasing Retired Dogs / Placing with Adopters
-
- Setting up your Administrator Account
- Adding More Users
- Changing User Permissions and Removing Users
- Managing List Customizations
- Customizing Regions
- Understanding the All Dogs page
- Using Searches and Reports
- Client Program Types and Training locations
- Order of Entry for Client Records
- Creating Client Records
- Facility Dog Applications
- Placing Dogs with Clients and Graduating Teams
- Creating Dog Records - What to Enter
- Creating Dog Records - Budgeting Time for Data Entry
- My Dogs Overview
- Preparing to Enter Foundation Breeders and Ancestors
- Claiming Records of Your Dogs Already in IWDR
- Adding Foundation/Ancestor Records
- Adding Foundation/My Dog Records
- Health Clearances for Foundation Breeders
- My Dogs Tabs Overview
- Entering Private People & Organizations
- Entering Public People and Organizations
- Creating Litter Records
- Overview of Estrus and Breeding
- Entering Juvenile Estrus/Puppy Heats
- Litter Tracking
- Breeder Host and Care
- Vet Care
- Foster Carer Application and Management
- Releasing Retired Dogs / Placing with Adopters
- Show all articles ( 16 ) Collapse Articles
-
-
Early Socialization
-
- Video - Coat Desensitization
- Video - Novel Objects
- Video - Trolley Ride with Mom
- Early Puppy Socialization - Novel Objects video
- Early Puppy Socialization – Novel Sounds video
- Early Puppy Socialization – Introducing New Environments video
- Early Puppy Socialization – Motor Development, Balance, Coordination, Proprioception video
- Early Puppy Socialization – Passive Environmental Enrichment in the Den video
- Early Puppy Socialization – Stairs
-
-
Genetic Selection & Inbreeding
-
- What are EBVs and how do they help?
- How EBVs are calculated
- What is needed to calculate EBVs and EBV accuracy?
- Using EBVs effectively
- Selection index
- Why are EBVs different for littermates?
- Presentation Recording: Improving behavior using EBVs
- Presentation Recording: Using EBVs successfully
- Presentation Recording - Improving health using EBVs
-
Webinars
-
Reproduction
-
Organization Management
Hip Penn Hip, Add new
0 out of 5 stars
| 5 Stars | 0% | |
| 4 Stars | 0% | |
| 3 Stars | 0% | |
| 2 Stars | 0% | |
| 1 Stars | 0% |
To enter a Hip Penn Hip diagnoses using the [Hip Penn Hip] tab in the [Vet Care Individual Dog]
To begin, follow steps on searching / selecting the dog with which you would like to add/edit their file.
Once selected, follow these steps…
1.Select the [Show Details] icon to the left of the dog’s name.
![]()
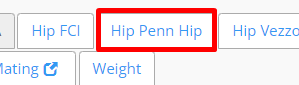
2. Select [Hip Penn Hip] from the menu tabs.
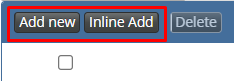
3. Select [Add new] or [Inline Add]
4. Enter the information in the fields shown. The two fields marked with a red *asterisk symbol are the only ones required, however if you have more information it is recommended to fill out as many fields as possible.
A. Measure 1 (right)
B. Measure 2 (left)
C. Cavitation – select Yes or No from the drop-down menu
D. *Measure Type – Select from the drop-down menu either – PennHip Scored by PennHip AIS or PennHip scored privately
E. *Diagnoses Date
F. Date is Estimated – If the Diagnoses Date is an estimate, check off the box. If the date is confirmed, just leave blank.
G. Who Diagnosed – Clinic or DVM. If not already in your list, Add new (in blueprint under the field)
H. Registry Name – PennHip is already entered in the system and is the only option in the drop down menu to select.
I. Certification Number – Once your PennHip report comes back you can enter the PennHip certification number off the report here.
J. Details – Enter any details you wish about the procedure or the diagnoses.

5. Once all the information is entered, click [Save] at the bottom of the screen, or with inline add click the check mark to left of row.![]()
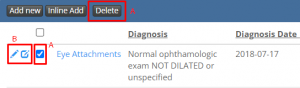
6. Once entered and saved, the diagnoses will appear in the list. If needing to edit (or add more info) later on or you need to delete if added in error, you can now do this.
6.a. If you are needing to delete a diagnoses, click the box to the left of the diagnoses and by doing so it will activate the delete button. Click [Delete] and confirm you wish to delete by clicking OK in the pop-up confirmation box.
6.b.To edit an entry, simply select the [Edit] icon – the pencil – to the left of the diagnoses you wish to edit – a pop-up window like above in #4 will appear OR click the box with the pencil in it, to edit in the [inline edit] format. The previous fields from #4 will appear. Edit / add to which ones are needed and click [Save] when finished.
7. You can also Attach documents (pdf’s, photos, etc.) to a diagnosis. See article on PDF’s, Photos, etc. here. Link to be added soon.
0 out of 5 stars
| 5 Stars | 0% | |
| 4 Stars | 0% | |
| 3 Stars | 0% | |
| 2 Stars | 0% | |
| 1 Stars | 0% |