Search for answers or browse our knowledge base.
Adding a New Dog (using Manage Your Dog’s Data, MyDogs)
Adding a new dog to the database through Manage Your Dog’s Data – [My Dog] where you are the owner, follow these steps…
*Note: To enter dogs not owned by your organization use *All Dogs (link to article coming soon). It is more efficient to enter a litter using Estrus, Puppies, Breeding Colony (link to article coming soon).
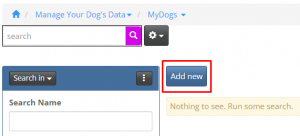
First check that the dog has not already been entered. THIS IS EXTREMELY IMPORTANT TO PREVENT DUPLICATE DATA. On home screen click on “All Dogs” in top left corner. There will be a search field to the top left. In this field type in part of the name. A pop-up box will appear with all dogs on the database that include that combination of letters in the name. If this search provides a large number of dogs, then you can narrow the search by entering the sex or other known data. (link to article coming soon).
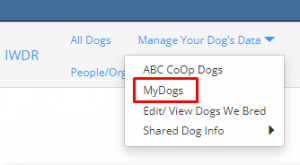
To begin adding a new dog through Manage Your Dog’s Data – [My Dog] where you are the owner, follow these steps…
- Under the heading tab Manage Your Dog’s Data, select [MyDogs]
- Click Add new button – do this after you have searched ALL possibilities to ensure you are not adding a duplicate record. (See above)
- Begin by entering the required data.
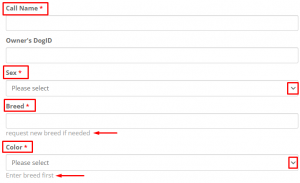
- The minimum data required is:
Call name: place dog’s name here and an abbreviation for the school owning the dog. This abbreviation should be consistent over the database. For e.g., GDNSW is designated for Guide Dogs NSW/ACT and should be used after the dog’s name on all dogs owned by Guide Dogs NSW/ACT
Sex: Select male or female from the drop-down menu
Breed: Enter the breed of dog – start by typing the breed in the field and a drop-down list will appear, select the breed. Send a request for a new breed to be added or cross breed to be entered through support@iwdr.org if you can not find the one you are looking for.
Color: After entering the breed, select the colour from the drop-down menu
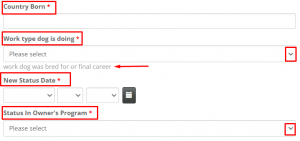
Country Born: place the unique identifier code designated for the dog by your school
What type dog is doing: This is the work type that the dog was originally trained for or another working career that the dog is ultimately performing if the dog is released (rejected for the original purpose)
New Status Date: enter the date that the status was changed
Status in Owner’s Program: select from the options available
In addition –
Data that is not required but is still important if you have it, please enter all that applies:
Owners DogID: enter your organization’s unique identifier for the dog. If you don’t have one, then use the IWDR DogID. This is visible in the upper left of the dog edit page once you save the record
Date of Birth: enter the date the dog was born
Birth Year: enter the year the dog was born
New Status Comments: comments about this status change. Note that the comments will be stored in the status history child table after clicking save. The field in the dog record will be cleared.
End Reason 1: Click [Select] below field to show drop down to indicate primary reason dog ended active status.
End Reason 2: Click [Select] below field to show drop down to indicate secondary reason dog ended active status.
General Notes: these notes are visible to all users. Use private notes (show details icon in dog’s file) for notes only users in your group can see on any dog
Pedigree Name (Registered name or breeders original name & ID): this is the name of the dog given by the breeder or previous organization. This could be a collar color, or a name, or a number. Enter this information here, and the name you will be calling the dog should be entered in the ‘Call name’ field.
Litter Description: enter the litter designation you assigned to this dog’s litter if there is one.
Sire: Dog must exist in database, type in dog’s name to have it appear in a drop-down list. Select the dog from the list you are looking for. If the dog you are looking for does not appear, it may not be in the system. Do a search in All Dogs to determine if they are there and if found, click the dog’s full name, and copy into the Sire’s field.
Dam: Dog must exist in database, type in dog’s name to have it appear in a drop-down list. Select the dog from the list you are looking for. If the dog you are looking for does not appear, it may not be in the system. Do a search in All Dogs to determine if they are there and if found, click the dog’s full name, and copy into the Dam’s field.
Managing Owner (edit rights): The Managing Owner of the dog is the organization that manages that dog’s data. It is not the guide/service dog user or adopter of the dog. You can put those people in the database as relationships. Type in the name, add new if no match. Note – if the owner is not known, store the breeder as the owner.
Breeder: enter the name of the breeder / organization where the dog came from. Type in the name, add new if no match.
Breeders DogID: ask the breeder for their unique identifier for this dog. Often it is the “school ID” or “Tattoo” or the database DogID. Leave blank if the breeder does not have a unique identifier
Microchip Brand: select the microchip from the drop-down box. If the brand is not there, click on the hyperlink Add New to enter the brand and go to that microchip company’s website to enter which country they are from and their website
Microchip Number: enter without using spaces, dashes, *, / etc. Add a new brand if the brand you use is not there. There is an option for unknown but please do your best to enter the type of microchip
Microchip Date: enter the date the microchip was implanted
Current Location: select from the drop-down menu, if no list formed yet, click [Add new] under the field and add a new location that will then appear in this selection list. You only have to add new a location once.
Location Start Date: enter the date the dog was moved to this location
Adopted Placement Type: This is where dog is placed currently. Select from the options in the drop-down menu.
Person responsible: enter the name of the person responsible for this dog. This could be the puppy raiser, trainer, or staff member. Type name, if not yet in system click [Add new] to add them.
In addition, following entering the initial required information and the additional non-required data fields you have the information for, scroll further down the page to add/edit other categories that are relevant to your new dog.
- Death
- Kennel Registration & K9Data ID
- Neuter or Breeding
- Physical Attributes
- Regions
Death:
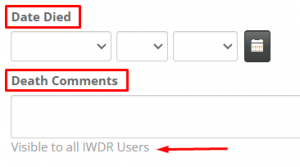
- Date Died: select the date the dog died.
- Death Comments: enter comments on cause of death or other details. REMEMBER to also enter a diagnosis. These comments are visible to all IWDR Users. Use private notes (show details icon in dog’s file) for notes only users in your group can see on any dog.
Kennel Registration & K9Data ID:
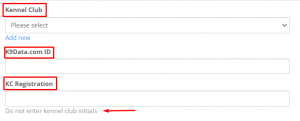
- Kennel Club: Enter the name of the Kennel Club. If not in system yet, select [Add new] printed in blue under the field to add the club to the database. You only have to add to the system the one time, it will appear in the list moving forward.
- K9Data.com ID: Enter the ID if you have it / if relevant.
- KC Registration: Enter the registration if you have it. Please do not enter kennel club initials, enter the full name.
Neuter or Breeding:
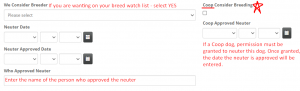
- We Consider Breeder – If you would like this dog to show up on your Breeder Watch List you can select ‘Yes’ from the drop-down menu. If you choose not to have them on the watch list, select No and enter the Neuter Approved Date. IMPORTANT: If this is a Coop dog, a neuter can not be performed until approval from the Coop is granted.
- Neuter Approved Date: this is the date you, as the owner make the decision to remove the dog from your breeder watch list.
- Coop Consider Breeding: In the case of a Coop dog, the box will be checked off. In this case, permission from the Coop must be granted to neuter this dog. A Coop Approved Neuter date must be entered by the Coop Admin. If you have a question regarding this permission, please contact your Coop Admin.
- Coop Approved Neuter: Once permission to neuter is granted by the Coop Admin, a date will be entered. This is the date the Coop approves removing the dog from the Breeder program. It is not an indication of when the dog should be neutered. (Meaning, if a neuter recommendation is granted to male puppies in a litter at 4 weeks of age, it is not the coop recommending that puppies get neutered at this age. Just the date they are released from the breeding program. Please work with your vet to determine the best age to neuter the dogs in your program.)
- Neuter Date: Once a surgical neuter procedure is completed, enter the date the dog was de-sexed.
- Who Approved Neuter: Type the name of the person who approved the dog could be de-sexed
Physical Attributes:
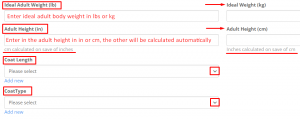
- Ideal Adult Weight (lb & kg):dog’s ideal adult weight. It can be entered as kg or pounds. To enter current weight, use the show details icon on the dog’s file and select [weight] tab.
- Adult Height (in & cm):dog’s adult height as measured from the top of the withers to the floor. The opposite value will be calculated.
- Coat Length: select an option from the drop-down menu, if option you are looking for is not available, click [Add new] and in pop-up window, select breed and Coat Length Text. Click [Save]. Samples of Coat Lengths are Short-Coated, Medium-Coated, Long-Coated.
- Coat Type: select an option from the drop-down menu, if option you are looking for is not available, click [Add new] and in pop-up window, select Breed and Coat Type (text). Click [Save]. Samples of Coat types are Smooth or Short-Coated, Wire-Haired Dogs, Long-Coated Dogs, Curly-Coated Dogs, Double-Coated, and Hairless (or Almost),
Regions:
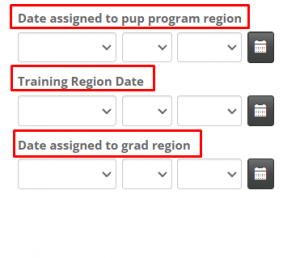
1.Enter Date assigned to pup program region.
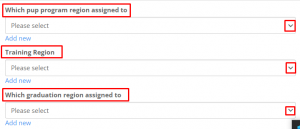
- 1.a. Enter Which pup program region assigned to, if option you are looking for is not available, click [Add new] and in pop-up window, add info. You will only have to add once then it will be in the system for next time.
2. Enter Training Region Date.
- 2.a. Enter Training Region, if option you are looking for is not available, click [Add new] and in pop-up window, add info. You will only have to add once then it will be in the system for next time.
3. Enter Date assigned to grad region.
- 3.a. Enter Which graduation region assigned to, if option you are looking for is not available, click [Add new] and in pop-up window, add info. You will only have to add once then it will be in the system for next time.
Finally,
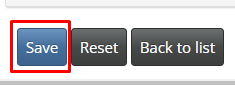
Once all data required and any additional non-required data is entered, click [Save] at bottom of page.