Search for answers or browse our knowledge base.
Estrus & Whelps
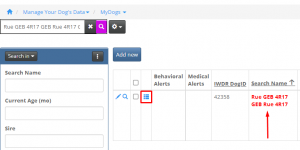
To begin, follow steps on searching /selecting the dog with which you would like to add/edit their file.
Once the dog is selected, follow these steps…
1.Select the [Show Details] icon to the left of the dog’s name.
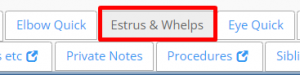
2. Select the [Estrus & Whelps] tab.
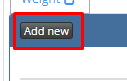
3. Click the [Add new] button, a pop-up window will then appear to add details
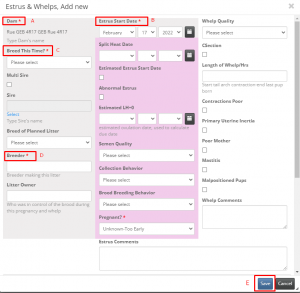
4. Next in the pop-up enter the following required information…
A. The Dam should appear automatically, if it does not, you need to go back and select the brood so you are on her file.
B. Estrus Start Date – Enter the date of the first sign of blood
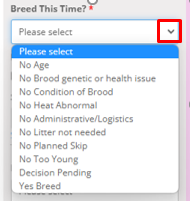
C. Breed This Time – Using the drop down menu, select the option you would like to do. If unsure if breeding at this time, select Decision Pending.
D. Breeder – Enter the breeder name – the Breeder is who is making this litter. (i.e., if this is an ABC dog, the breeder will always be ABC Breeding Cooperative)
E. Save – Once all information is entered click [Save] at the bottom of window.
The rest of the info is good to enter if you have it, but not required to save. And some info will be required later on (if breeding for example, like adding a sire, breeder, litter owner).
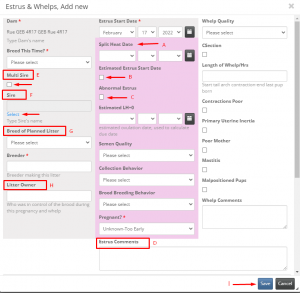
A. Split Heat Date – If the estrus seems to be a Split Heat – enter the second date the estrus restarts here
B. Estimated Estrus Start Date – If the Estrus Start Date entered above is an estimated date, because you are suspicious this was not the date of first signs, check the box in this field.
C. Abnormal Estrus – If the estrus is abnormal, check the box in this field and proceed to D.
D. Estrus Comments – Enter any further details on behaviors seen during estrus, abnormal estrus, etc. This will help you to monitor from one estrus to another if there is a pattern, something is normal or abnormal for this brood during her seasons.
E. Multi Sire – When a decision to breed using multiple sires is made, check this box. Leave the Sire field blank. – See instruction article on Multi Sire
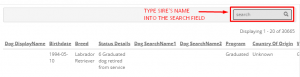
F. Sire – Once a decision is made to [Breed This Time] and a single sire has been chosen, select the sire by clicking on the word [Select] in blue print under the field Sire. A pop-up window will appear where you will type the sire’s name in the search field in the top right corner. Click the [search] icon – the magnifying glass – and a list of any matches from what you typed will appear (the more detail you enter in the name will narrow the selections). Select the matching Sire from the list.
G. Breed of Planned Litter – Select from the drop down menu the breed. Once you know both the Dam and Sire being used, you can select the appropriate breed. If this is a cross breed, select the appropriate listing. (LGX1 – would be a full LR crossed with a full GR, LGX2 would be a LGX1 bred with a full LR or GR, and so on… LGX3, LGX4, LGX5 for example based on the number of generations).
H. Litter Owner – The organization or person who is in control of the brood during this pregnancy and whelp.
I. Save – Ensure after adding any changes to the page you click [Save] at the bottom of the page.
5. Once the estrus details are entered, the estrus will now show in a list under the main Estrus & Whelps tab. Here you can make edits to the estrus, come back to add sire, or additional information on the estrus. Or you can begin adding to the estrus details (progesterone testing or other related labs, insemination method, pregnancy check, etc.)
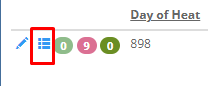
5.a. Click the [Edit] icon (the pencil) to edit the estrus entry
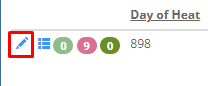
5.b. Click the [Show Details] table icon to add estrus details
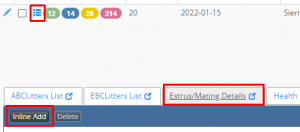
6. The next step will be to add the Estrus / Mating details.
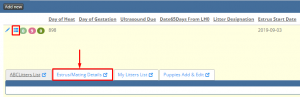
6.a. Click on Show Details icon
6.b. Select Estrus/Mating Details
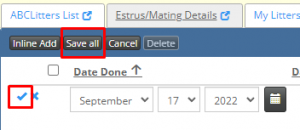
6.c. Click on Inline Add button
7. Enter Date Done

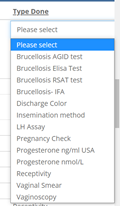
8. Enter Type Done – Please Select from drop down menu the ‘Type’ of test done.
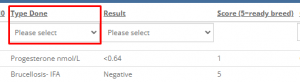
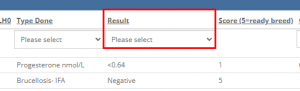
9. Enter Result – Please select the matching result from the drop-down menu. Each menu will be different depending on the [Type Done] selected. If the Result is a range, enter the true result in the comment section.
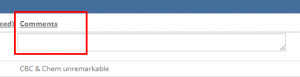
10. Enter Comments – Enter any further details to the entry needed, e.g. specific progesterone results, complications, shipment details, etc.
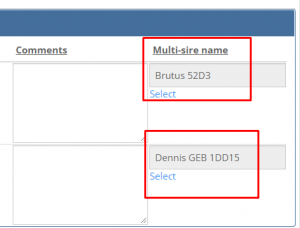
11. Multi Sire – If you checked off Multi-Sire on the [Edit] page; when entering the [Type Done] for Insemination Method, select the sire of that sample under Multi-sire name to the far right in the row.
This will generate a stud list when going back to enter the results of the DNA under the [Puppies Add & Edit] section. Entering the studs here, rather than in the comments section will allow IWDR to track stud productivity.
12. You can continue to add as many individual details as needed by clicking [Inline Add] and repeating steps 7-11 for each.
Once all the information is added, click [Save all] which will save all your entries at once. You can also save individual entries by clicking the [check mark] to the left in the row.
[
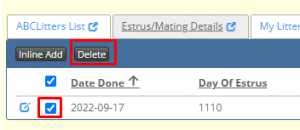
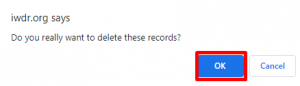
13. Delete – Deleting an entry can be done by selecting the box to the left of the date in the row you wish to delete. This will activate the delete button, click [Delete] and confirm on pop-up window by clicking [OK]