-
Behaviour Scoring
-
- 1. Anxious in unfamiliar situations
- 2. Fear Of Noises
- 3. Fear of Novel Objects
- 4. Fear of Underfootings
- 5. Fear of Dogs
- 6. Fear of Stairs
- 7. Fear of Traffic
- 8. Separation Anxiety
- 9. Hyper-Attachment
- 10. Fear Of Strangers
- 11. Body Handling Concern
- 12. Retreats When Reached For
- 13. Harness Handle On Back Sensitivity
- 14. Avoidance Of Blowing Fan
- 15. Body Sensitivity To Object Contact
- 16. Anxious About Riding In Vehicles
- 17. Inhibited or passively avoidant when exposed to potentially stressful situations
- 18. Activated when exposed to potentially stressful situations
- 19. Excitable
- 20. Slow To Return To Productive Emotional State
- 21. Fidgety When Handler Is Idle
- 22. Fear On Elevated Areas, Drop-Offs Etc.
- 23. Barks Persistently
- 24. High Energy Level
- 25. Lacks Focus
- 26. Movement Excites
- 27. Chasing Animals
- 28. Dog Distraction
- 29. Sniffing
- 30. Scavenges
- 31. Inappropriate Behavior Around The Home
- 32. Lacks Initiative
- 33. Not Willing
- 34. Resource Guarding Toward People
- 35. Aggression Toward Strangers
- 36. Aggression Toward Dogs
- 37. Resource Guarding Toward Dogs Or Other Pets
- 38. Inappropriate Elimination While Working En Route
- 39. Socially Inappropriate Behavior With People
- 40. Inconsistent
- 41. Handler/Dog Team
- 42. Relationship Skills
- 43. Comparison 9 To 1 Score
- 44. Socially Inappropriate Behavior With Dogs
- 45. Thunder Reaction Prior To, During Or Immediately After A Thunderstorm
- 46. Kennels Poorly
- 47. Working Speed
- 48. Gait When Moving Out
- 49. Housebreaking Problems
- 50. Innate Desire To Work
- 51. Avoidance Of Exhaust From Vehicles
- Show all articles ( 36 ) Collapse Articles
-
-
-
Practice Videos
-
Behavior Testing
-
Database User Manual
-
-
-
- Adding a New Dog (using Manage Your Dog’s Data, MyDogs)
- Alerts
- BCL, Behavior Checklist
- Elbow Quick, Add new
- Estrus & Whelps
- Eye Quick
- Genetic Test Panel
- Genetic Test Quick
- Health Diagnoses Add/Edit
- Health History Report
- Health Normals, Add new
- Heart Quick
- Hip BVA, Add new
- Hip FCI, Add new
- Hip OFA, Add new
- Hip Penn Hip, Add new
- Photos PDFs etc.
- Private Notes
- Procedures, Add new
- Reminders
- Share my dog data to another organization
- Skin Quick
- Status History
- Weight - Entering a dog's weight
- ADI Public Access Test
- Hip Vezzoni, Add new
- Status Detail
- Edit or Change Call Name / Pedigree Name / Owner ID
- Add New Microchip / Delete Incorrect Microchip
- End Reasons
- Juvenile Estrus
- Communications Activities
- Incidents
- Show all articles ( 18 ) Collapse Articles
-
- Articles coming soon
-
-
-
-
- Alternate Therapy/Rehab
- Diagnostic Imaging, Add new / Edit or Delete
- Diet
- Elbow Quick, Add new / Edit or Delete
- Estrus & Whelps, Add new
- Eye Quick, Add new / Edit or Delete
- Genetic Test Quick, Add new / Edit or Delete
- Health Diagnoses, Add new / Edit (Update) or Delete
- Health History Report, Generate a PDF
- Health Normals
- Health Screening List
- Hip OFA Add new / Edit or Delete
- Hip Penn Hip Add new / Edit or Delete
- Hospitalization, Add new
- Kennel Tasks, Add new / Edit or Delete
- Lab, Add new / Edit or Delete
- Photos, PDFs, etc., Add new
- Reminders Add new / Edit or Delete
- Rx, Add new / Edit or Delete
- Semen Cryo, Add new / Edit or Delete
- Skin Quick Add new / Edit or Delete
- SOAP, Add new / Edit or Delete
- Status History
- Supplies Used, Add new / Edit or Delete
- Surgery, Add new
- Treatments Add new / Edit or Delete
- Vaccines Add new / Edit or Delete
- Weight and BCS Body Condition Score - Add new / Edit or Delete
- Hip Vezzoni, Add new
- Show all articles ( 14 ) Collapse Articles
-
-
-
-
Early Socialization
-
- Video - Coat Desensitization
- Video - Novel Objects
- Video - Trolley Ride with Mom
- Early Puppy Socialization - Novel Objects video
- Early Puppy Socialization – Novel Sounds video
- Early Puppy Socialization – Introducing New Environments video
- Early Puppy Socialization – Motor Development, Balance, Coordination, Proprioception video
- Early Puppy Socialization – Passive Environmental Enrichment in the Den video
- Early Puppy Socialization – Stairs
-
-
Genetic Selection & Inbreeding
-
- What are EBVs and how do they help?
- How EBVs are calculated
- What is needed to calculate EBVs and EBV accuracy?
- Using EBVs effectively
- Selection index
- Why are EBVs different for littermates?
- Presentation Recording: Improving behavior using EBVs
- Presentation Recording: Using EBVs successfully
- Presentation Recording - Improving health using EBVs
-
Webinars
-
Reproduction
-
Organization Management
Genetic Test Quick
To begin, follow steps on searching /selecting the dog with which you would like to add/edit their file.
Once the dog is selected, follow these steps…
1.Select the [Show Details] icon to the left of the dog’s name.
![]()
2. Select the [Genetic Test Quick] tab.

3. Click the [Add new] or [Inline Add] – Either of these options will provide the same menu. [Add new] will pop-up a new window, whereas [Inline Add] will add a row below the blue bar to create a list.

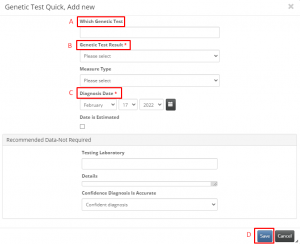
4. Next in the pop-up or the row line that appears, enter the following required information…
A. Which Genetic Test
B. Genetic Test Results
C. Diagnoses Date – Enter the date the supplies were used.
D. Once all information is entered click [Save] at the bottom of window.

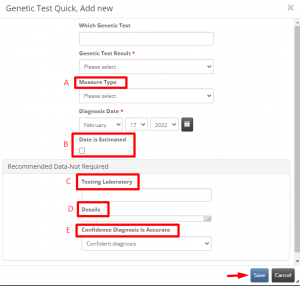
The rest of the info is good to enter if you have it, but not required to save.
A. Measure Type – select from drop-down menu
B. Date is Estimated – if unsure as to when the tests were completed, click the box
C. Testing Laboratory – Start typing the name in the field of the laboratory, if the one you are looking for does not appear, please submit a ticket to support@iwdr.org to request a new laboratory be added.
D. Details – enter any additional information here
E. Confidence Diagnosis is Accurate
Be sure to save any added information before exiting

5. Once entered and saved, the genetic tests entered will appear in the list on the main tab page. If needing to edit (or add more info) later on or you need to delete if added in error, you can now do this.
5.A. To edit an entry, simply select the [Edit] icon or the [Inline Edit] – the pencil or the box with a pencil in the corner, to the left in the row you wish to edit. The previous fields from #4 will appear. Edit / add info to which ones are needed and click [Save] when finished.
5.B. If you are needing to delete a record, click the box to the left of the row and by doing so it will activate the [Delete] button. Click [Delete].
5.C. It will prompt you to confirm you want to delete the record by clicking [Ok] on the next pop-up window.


